
A skilled DIYer can handle removal, prep, and finishing. But drain connections, P-trap work, and any powered features (jets, heated seats, air systems) legally require licensed professionals in most jurisdictions. Skipping that step risks safety hazards, failed inspections, and voided warranties.
The most common post-installation failures aren't dramatic — they're slow. Door seals that weep a few drops per fill. An unlevel tub that stresses the drain connection over months. A 40-gallon water heater that can't keep pace with a walk-in tub's 50–70 gallon fill demand. These failures are entirely preventable with proper planning.
This guide walks through every phase: prerequisites, step-by-step installation, common problems, and post-installation validation.
Key Takeaways
- Licensed plumbers and electricians are required for drain connections and powered features in most US jurisdictions
- Verify subfloor load capacity before ordering — a filled walk-in tub can weigh 700+ lbs
- Jets, heated seats, and air systems all require a dedicated GFCI-protected circuit — no exceptions
- Professional two-person crews typically finish in one to two days; DIY takes considerably longer
- Always complete post-installation validation checks before first use to avoid costly failures down the line
Installation Guide for a Walk-In Tub Shower
Installation follows four sequential phases: site preparation → unit placement and plumbing connection → shower system integration → finishing and sealing. Skipping steps in any phase — particularly leveling before plumbing — almost always means disassembly and rework.
A professional two-person crew typically completes the project in one to two full days, depending on bathroom layout, access difficulty, and how well existing plumbing aligns with the new unit.
Prerequisites and Safety Considerations
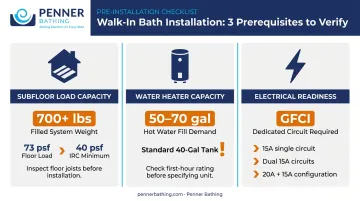
Three site readiness checks must happen before you order anything:
Subfloor load capacity — A filled walk-in tub can weigh over 700 lbs. For reference, one American Standard 30×52-inch model weighs 155 lbs empty and 781 lbs filled, producing a floor load of 73 psf. The IRC 2021 residential live load minimum is 40 psf — well below what many filled walk-in tubs impose. Have a contractor assess your joists and subfloor before the unit arrives.
Water heater capacity — Walk-in tubs typically require 50–70 gallons of hot water per fill. Most standard 40-gallon tanks cannot keep pace. Check the heater's first-hour rating, not just the tank size. If yours falls short, budget for an upgrade before installation day.
Electrical readiness — Any powered features (jets, heated seat, inline heater) require a dedicated GFCI-protected circuit per IRC 2021 E4209. Depending on the feature package, that may mean one 15A circuit, two 15A circuits, or a 20A and 15A combination. Confirm your model's exact requirements with the manufacturer.
Additional compatibility checks:
- Confirm drain rough-in location matches or can be adapted to the existing drain position
- Verify door swing direction (inward vs. outward) fits your bathroom layout
- Measure doorway width — some models require temporary door frame removal for entry
Non-negotiables before proceeding:
- Do not install over a subfloor showing rot or water damage
- Do not connect electrical components without GFCI protection
- Do not modify gas lines for water heater upgrades without a licensed professional
- Check local permit requirements — most jurisdictions require permits for plumbing modifications or new electrical circuits
These requirements directly shape which model will work for your space. Look for UL and CUL listings when evaluating units — these confirm independent safety testing and are non-negotiable for any powered model. Penner Bathing's Dream Spa Walk-In Bath carries both listings and includes on-site evaluation support. Call 1-800-732-0717 for pre-purchase technical consultation.
Tools and Parts Required
Essential tools:
- Adjustable wrench, basin wrench, pipe wrench
- 48-inch level
- Drill with bits
- Utility knife
- Silicone caulk gun
- Plumber's putty and Teflon tape
- Voltage tester
- Reciprocating saw (for subfloor repairs or door frame modification)
Parts and materials typically required:
- Drain assembly (confirm whether included with the unit)
- Overflow plate
- Supply line extensions if relocation is needed
- Water supply shutoff valves
- Backer board or cement board for surround walls (if rebuilding)
- Shower head with handheld wand on an adjustable slide bar
- Shower curtain rod or door track hardware
- 100% silicone sealant rated for wet areas
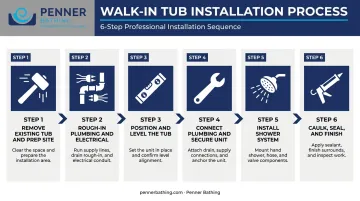
How to Install a Walk-In Tub Shower: Step-by-Step
The most common installation mistake is connecting plumbing before the tub is leveled — this almost always requires full disassembly and rework. Follow the sequence below exactly.
Step 1 — Remove the existing tub and prepare the site
- Shut off water supply at the main or local shutoff
- Disconnect and cap supply lines
- Remove old tub surround panels or tile as needed
- Cut caulk seals and disconnect the drain
- Remove the old unit (cast iron tubs may need to be broken apart with a reciprocating saw)
- Inspect and repair the subfloor now — this is the lowest-cost point to address any structural issues
Step 2 — Rough-in plumbing and electrical
- Confirm drain rough-in location aligns with the new unit or have a licensed plumber reroute
- Install a new P-trap if required (minimum 1½-inch trap per IPC Table 709.1; horizontal drain lines 2½ inches or smaller must slope at least ¼ inch per foot)
- Run supply lines to the tub's inlet position
- Have a licensed electrician install the dedicated GFCI circuit at this stage — do not defer electrical prep until after the tub is in place
Step 3 — Position and level the tub
- Measure doorway clearance one final time; remove door frame temporarily if needed
- Move the unit into position with at least two people
- Align the drain outlet with the P-trap
- Use adjustable feet or shims to level the unit in both directions, checking with a level across the tub base
- An unlevel tub stresses the drain connection and causes premature seal failure
Step 4 — Connect plumbing and secure the unit
- Attach the drain assembly with plumber's putty beneath the flange; tighten from below
- Connect the P-trap to the drain outlet
- Attach supply lines to faucet inlets
- Secure the tub to the wall using anchor flanges or brackets per manufacturer instructions — do not rely on caulk alone
- Connect the overflow plate assembly
Step 5 — Install the shower system
- Attach the shower arm to the existing or newly roughed-in supply stub
- Install a handheld wand on an adjustable slide bar for seated bathing
- If wall panels or a surround are included: install back wall first, then side walls, with silicone at all seams and corners
- Install shower curtain rod or door track
- Seal all wall panel seams against water intrusion behind the surround
Step 6 — Caulk, seal, and finish
- Apply a continuous bead of 100% silicone caulk along all seams where the tub meets the wall, floor, and surround panels
- Tool the bead smooth and allow full cure time before exposing to water
- Install trim pieces, access panels, and decorative moldings
- Restore the door frame if removed
- Turn on water supply gradually and check all connections
Post-Installation Checks and Validation
Walk-in tub leaks rarely announce themselves immediately. A slow drip beneath the unit can saturate the subfloor for weeks before any visible damage appears — by then, repairs run far beyond what a quick post-install check would have cost. Run through these steps before calling the job done.
Visual and Structural Checks
Before filling the tub, verify:
- Tub sits level in both axes
- No gaps in caulk seams along the tub-to-wall joint
- All supply line connections are properly tightened (not overtightened or loose)
- Inward-opening door closes and latches fully without binding
Functional Testing Sequence
- Partial fill test — Fill approximately one-third full; check beneath the unit and around the drain for any drips
- Drain speed — Safe Step documents an average drain time of 5–15 minutes; slower drainage indicates a blockage or inadequate drain line slope
- Shower function — Test handheld wand for consistent pressure and temperature
- Powered features — Run jets or air systems through a full cycle if installed
- Door seal test — Fill to normal depth and press lightly on the door; no water should escape the seal
Common Installation Problems and How to Fix Them
Slow or Poor Drainage
Problem: The tub takes significantly longer than the 5–15 minute benchmark to drain.
Likely causes:
- Drain line undersized for the tub's volume
- P-trap installed with insufficient slope (minimum ¼ inch per foot required)
- Construction debris partially blocking the line
Fix: Clear debris with a drain snake. Verify slope meets code minimum. If the drain line diameter is the issue, consult a licensed plumber about upsizing.
Door Seal Leaking
Problem: Water escapes around the door during use, wetting the bathroom floor.
Likely causes:
- Tub is not level, distorting the door frame
- Door gasket was pinched or misaligned during installation
- Tub was filled before caulk fully cured
Fix: Recheck and correct levelness using adjustable feet. Inspect the gasket for damage or misalignment and reseat or replace it. Ensure caulk has fully cured before refilling.

Insufficient Hot Water Supply
Problem: The tub fills cold or lukewarm before reaching bathing depth.
Likely causes:
- A standard 40-gallon tank cannot supply the 50–70 gallons most walk-in tubs require to fill
Fix: Upgrade to a larger storage tank or a tankless water heater sized for the tub's fill rate. As a short-term workaround, fill more slowly to allow the heater to recover, but plan for a permanent upgrade.
Pro Tips for Installing Your Walk-In Tub Shower Effectively
Sequence matters: Complete all rough-in plumbing and electrical work before positioning the tub. Attempting to reach connections behind or beneath an installed unit is significantly harder and a common source of errors.
Document everything: Photograph all rough-in connections before closing walls or installing surrounds. This documentation is invaluable during troubleshooting and is often required for warranty claims or permit inspections.
Anti-scald valve: Install or verify an anti-scald (thermostatic) mixing valve at the supply connection. IPC Section 424.5 requires hot water supplied to bathtubs to be limited to 120°F by a listed water-temperature-limiting device. This is a critical protection for elderly or mobility-impaired users who may have reduced heat sensitivity.
Know when to call a professional: Some situations consistently cost more to fix after a DIY attempt than to hire out from the start:
- Moving the drain more than a few inches from its current position
- Subfloor repairs or structural reinforcement beneath the unit
- Running a new dedicated circuit from the electrical panel
Penner Bathing offers on-site evaluation and staff training support, plus 24/7 live phone support at 1-800-732-0717 to help you work through installation planning before committing to an approach.
Conclusion
Installation quality directly determines whether a walk-in tub shower delivers on its promise. Even small oversights — an unlevel tub, a weak drain seal, a water heater that can't keep up — will erode the accessibility and therapeutic value the unit exists to provide.
Give the preparation phase its due time, follow the installation sequence without skipping steps, and complete post-installation validation before first use. For plumbing and electrical work specifically, engage licensed professionals. Correcting those mistakes after the fact costs far more — in time, money, and risk — than doing them right the first time.
Frequently Asked Questions
How much does it cost to install a walk-in tub and shower?
According to 2026 cost data from Angi, total installed costs average around $8,000 with a range of $4,000–$15,000; HomeAdvisor puts the average higher at $13,100. Cost varies based on the tub's feature level, required plumbing and electrical changes, and local labor rates.
Which is cheaper, a walk-in tub or a walk-in shower?
Walk-in showers generally cost less to purchase and install, with Angi citing an average of $9,000 for a standalone walk-in shower. However, walk-in tubs offer therapeutic soaking and seated bathing that showers can't replicate, so cost alone shouldn't drive the decision.
Can I install a walk-in tub shower myself, or do I need a licensed professional?
Removal, leveling, and basic finishing can be handled by a skilled DIYer. Plumbing connections and any electrical work for powered features legally require licensed professionals in most jurisdictions. Skipping that step creates safety hazards and typically voids the product warranty.
Do I need a permit to install a walk-in tub with shower?
Most jurisdictions require permits when the work involves plumbing modifications or new electrical circuits. Check with your local building department before starting — unpermitted plumbing and electrical changes can create significant problems when selling the home.
How long does a walk-in tub shower installation typically take?
A professional two-person crew typically completes installation in one to two days. DIY installations without prior plumbing experience can take considerably longer, particularly if subfloor issues or drain rerouting are involved.
What size walk-in tub will fit in my existing bathroom?
Measure available floor space (length and width), the doorway width the unit must pass through, and any clearance constraints. Most walk-in tubs fall between 28×47 inches and 32×54 inches, but always confirm the specific manufacturer's minimum clearance requirements before purchasing.