
Confident DIYers comfortable with basic plumbing can handle a straightforward alcove tub swap. But heavy tubs, drain relocations, or any subfloor damage typically call for a licensed plumber or contractor. This guide walks through every phase — removal, inspection, installation, waterproofing, and troubleshooting — so you know exactly what you're getting into before you pick up a pry bar.
Key Takeaways
- Bathtub replacement typically takes 1–3 days, depending on tub type and bathroom condition
- Always inspect the subfloor for rot or soft spots before setting the new tub
- Support method (mortar bed, adjustable feet, or shims) varies by tub model — confirm with your manufacturer's specs
- 100% silicone sealant at all joints is mandatory; grout is not waterproof
- Hire a professional if the drain needs relocating, the tub is cast iron or stone resin, or the subfloor is structurally damaged
Before You Start: Prerequisites, Tools, and Safety
What to Confirm Before Touching Anything
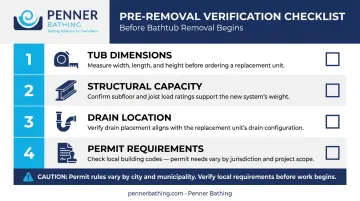
Four things need verification before any demo work begins:
- Tub dimensions — measure the alcove or floor space carefully and confirm the new tub fits, including clearance through doorways and hallways on the route in
- Structural capacity — verify the subfloor and floor joists can handle the tub's combined weight (empty tub + water + bather); tub weights vary considerably by material and model, so use your specific tub's published specs and floor load requirements rather than guessing
- Drain location — confirm whether the new tub's drain aligns with the existing P-trap; any relocation triggers permit requirements in most jurisdictions
- Permit requirements — rules vary by city; Portland requires a plumbing permit to replace a tub, Boston requires one obtained by a licensed contractor, while NYC exempts fixture replacement from permits but still requires a Licensed Master Plumber for the plumbing work. Check your local building department before starting
Choosing the Right Replacement Tub
- Alcove/built-in tubs — the most DIY-friendly option; straightforward flange-to-stud fastening, minimal framing changes
- Freestanding tubs — more complex anchoring; typically use adjustable feet plus shims for uneven floors
- Undermount/deck tubs — require framing, extensive waterproofing, and are best handled by a contractor
Before settling on a tub type, consider who will be using it. If the bathroom serves seniors or anyone with mobility limitations, a standard tub swap may not be the right call.
The CDC reports that more than 14 million adults age 65+ fall each year, and the bathroom is a primary risk environment. Walk-in tubs, like the Penner Dream Spa Walk-In Bath, offer a side-entry, outward-swinging door that eliminates the need to step over a tub wall entirely. The user sits on the edge and swings their legs in, a meaningful design difference from standard tubs. For households where aging in place is the goal, that may be a more appropriate replacement than any conventional tub.
Tools and Materials Checklist
Essential tools:
- Adjustable wrench, basin wrench, pliers
- Pry bar, utility knife, reciprocating saw
- Level, tape measure, drill/driver
- Caulk gun, shop vac, PPE (gloves, safety glasses)
Essential materials:
- New tub with drain/overflow kit and P-trap
- Mortar (sand mix) or adjustable leveling feet
- 100% silicone sealant (bath-rated)
- Cement backer board and waterproof membrane
- Ledger board lumber, galvanized screws, shims
How to Remove Your Existing Bathtub
Step 1: Shut Off Water and Access the Plumbing
Turn off the main water supply to the bathroom, then open the faucet to release line pressure and let residual water drain. Locate the access panel behind or below the tub — this is your entry point to the drain shoe, overflow pipe, and P-trap without cutting into finished walls.
Step 2: Disconnect the Plumbing
Using a basin wrench or pliers, disconnect the plumbing components in this order:
Using a basin wrench or pliers, disconnect the following:
- Drain shoe
- Overflow plate and linkage
- P-trap connection
Inspect existing fittings before setting anything aside. Corroded galvanized pipe or deteriorated gaskets need full replacement — not reuse.
Step 3: Remove the Surround and Trim
Score all caulk lines with a utility knife. Remove tile, acrylic surround panels, or drywall sections around the tub flange as needed. Work carefully to expose the flange without damaging adjacent studs. Lay cardboard or drop cloths on the subfloor to keep debris contained.
Step 4: Extract the Tub
With a helper, lift or slide the tub out through the open end of the alcove. Use moving blankets or cardboard under the tub edge to protect both the tub and the floor during removal.
Important exception: Cast iron tubs can exceed 300 lbs empty. They sometimes need to be broken apart in place with a reciprocating saw rather than moved whole — protect yourself with full PPE for this step.
Step 5: Inspect the Subfloor — Don't Skip This
Once the tub is out, probe the entire exposed subfloor before doing anything else. What you find here determines whether this stays a straightforward swap or turns into a structural repair job.
Look and feel for:
- Soft spots or noticeable give underfoot
- Discoloration or visible water staining
- Damaged or weakened joists
Address any issues now: sister compromised joists, replace damaged subfloor sections, and confirm stud walls are plumb and square before the new tub goes in.
How to Install Your New Bathtub
Prep the Space and Dry-Fit First
Before any mortar, fasteners, or permanent connections, set the tub in position on cardboard. Align the drain opening with the P-trap location and the overflow with the back wall. Mark the ledger board height on the studs and note faucet centerlines. Confirm all measurements match the manufacturer's rough-in specs.
If the drain location needs adjustment, adjust the plumbing rough-in now — before anything is permanently set.
Set, Level, and Secure the Tub
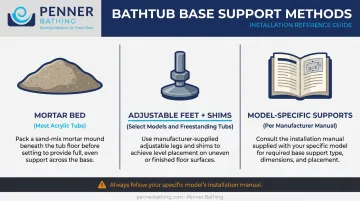
Building the base depends on your tub model — this is not one-size-fits-all:
- Most acrylic tubs require a mortar bed (sand-mix, firm consistency) placed in mounds under the tub footprint; skipping this causes flexing at the drain joint and eventual leaks
- Some models permit adjustable feet with shims instead; others allow grout or integral supports
- Freestanding tubs typically use adjustable feet plus shims for uneven floors
- Follow your specific model's installation manual — the support method specified there is what actually matters
Once the base is set, check level front-to-back and side-to-side with a long level before the mortar cures. Correct any tilt with shims.
For alcove installs, set the ledger board at the marked height, rest the tub flange on it, and fasten the flange to studs with manufacturer-specified screws or clips. Don't over-tighten — crushing the flange creates stress cracks.
Connect the Drain and Overflow
Assemble the drain shoe, overflow pipe, and bath waste kit onto the tub before final placement where possible. When connecting to the P-trap below, two specs matter:
- Use rubber gaskets and plumber's putty or silicone — some acrylic and ABS surfaces require silicone specifically and are incompatible with putty; check your manufacturer's instructions
- Per the 2021 IRC, bathtub traps require a minimum 1.5-inch trap size; tighten fittings firmly but avoid over-torquing acrylic components
Fill the tub with water and inspect every connection before closing up walls or installing the surround. This is your only easy opportunity to catch a leak.
Waterproof and Seal the Surround
- Install cement backer board (not standard drywall) in the wet zone; per IRC Section R702.4.2, paper-faced drywall is not an approved tile backer in tub areas
- Apply a continuous waterproof membrane over the backer board with at least two coats
- Tape all seams, corners, and penetrations with approved membrane tape before tiling
- At every transition — tub flange to wall, surround to tub edge — apply a clean bead of 100% silicone sealant
One point worth getting clear: grout is not waterproof. The membrane carries all the protective load; grout just fills the joints visually. Per TCNA EJ171, changes of plane require flexible sealant, not rigid grout — any gap in the membrane becomes a direct entry point for moisture and mold.
Common Bathtub Replacement Problems and How to Fix Them
Most bathtub replacement issues trace back to a handful of recurring mistakes — an uneven subfloor, a misaligned drain, or a skipped mortar bed. Here's how to identify and correct the most common ones before they require a second round of demo.
Tub Won't Sit Level
- Symptom: Tub rocks or water pools at one end
- Cause: Uneven subfloor, insufficient mortar coverage, or incorrectly set adjustable feet
- Fix: Remove the tub, re-evaluate the subfloor with a level, then reset the mortar bed or adjust feet for full-coverage contact across the entire tub footprint
Slow Drain or Leak at the Drain Shoe
- Symptom: Water drains slowly or seeps around the drain connection
- Cause: Misaligned P-trap, improperly seated drain gasket, or wrong sealant at the drain shoe
- Fix: Access from below or through the access panel, reseat the gasket, realign the trap to eliminate sags, and retest with a full tub before closing up
Flexing or Creaking Acrylic Base
- Symptom: Base flexes or creaks when stepping in
- Cause: Mortar bed was skipped, too thin, or cured without the tub resting on it
- Fix: No patch from above works. The tub must come out and be reset with a proper full-coverage mortar bed per the manufacturer's installation sheet
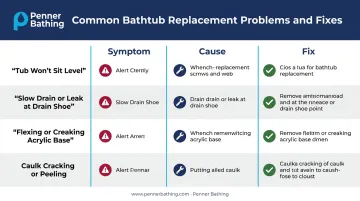
Caulk Cracking or Peeling at Joints
- Symptom: Sealant separates from the tub or surround within weeks or months
- Cause: Wrong sealant type (latex caulk in a wet zone), joint movement from an unsupported tub, or application to a damp or unclean surface
- Fix: Strip all failed sealant, address any underlying support issue first, then re-apply 100% bath-rated silicone to a dry, clean surface
Pro Tips for a Successful Bathtub Replacement
Before closing any walls, fit an access panel behind or beside the tub. This one step can save you from cutting open a finished wall if a drain or supply connection needs attention years from now.
Cover the new tub surface with cardboard or a purpose-made tub protector before any tile, grout, or debris work begins. Damage to the finish during construction voids most manufacturer warranties.
Stop and bring in a licensed plumber or contractor if any of the following apply:
- The subfloor shows structural damage beyond cosmetic rot
- The drain needs to be relocated
- The new tub is cast iron, stone resin, or any other heavy material that may require floor reinforcement
- Local code requires permits or licensed trade work for the fixture change
Pulling the right permits upfront also protects your home's resale value — unpermitted plumbing work can surface during a future inspection.
Frequently Asked Questions
How much does it typically cost to install a bathtub?
According to HomeGuide's 2025 data, installed costs typically run $1,500–$2,000 for a standard alcove swap, $2,200–$5,000 for freestanding, and $1,200–$8,000 for undermount or deck installs. Labor, subfloor repairs, and permit fees are the main variables.
What do you put under a bathtub when installing it?
Most acrylic and fiberglass tubs require a mortar bed for full, even support — though some models allow adjustable feet, shims, or grout instead. The correct method is always the one specified in your tub model's installation manual, not a universal rule.
Can I remove and replace a bathtub myself?
A like-for-like alcove tub swap is within reach for a confident DIYer comfortable with basic plumbing. Heavy tubs, drain relocations, structural damage, or undermount/deck installs are better handled by a licensed professional.
How long does it take to remove and replace a bathtub?
Removal typically takes 2–4 hours. A basic alcove install can be completed in a day. Freestanding or undermount installs with waterproofing and tile work extend to 2–3 days — not counting mortar and sealant cure times.
Do I need a permit to replace a bathtub?
Requirements vary by location — NYC exempts same-location swaps, while cities like Portland and Boston require one. Moving the drain, altering venting, or adding a circuit for a jetted tub almost always triggers a permit. Check with your local building department before starting.
What is the easiest type of bathtub to install?
A standard acrylic or fiberglass alcove tub replacing a same-size unit is the most DIY-friendly option. It typically requires no drain relocation, minimal framing changes, and straightforward flange-to-stud fastening.