
That said, technique matters far more than most new CNAs expect. A 2023 observational study of 100 bathing episodes in eight California nursing homes found inadequate cleansing at 88%–100% of assessed body sites, insufficient water warmth in 86% of sessions, and incomplete towel drying in 94% of showers. These aren't minor oversights — they affect skin health, infection risk, and resident dignity.
This guide covers everything CNAs need to perform a partial bath correctly: required supplies, step-by-step technique, infection control standards, and common errors that show up on both the clinical skills exam and in real-world practice.
Key Takeaways
- A partial bath covers the face, underarms, arms, hands, and perineal area — performed daily to maintain hygiene between full baths
- Always follow the resident's care plan and respect their right to choose or refuse bathing
- Use a clean washcloth section for each body area, working head to toe, to prevent cross-contamination
- Wear gloves, confirm water temperature, and protect the resident's privacy throughout the procedure
- Document and report skin changes, unusual odors, or signs of pain noticed during the bath
What Is a Partial Bath and When Should CNAs Use It?
A partial bath focuses on the body areas most prone to odor and infection: the face, underarms, arms, hands, and perineal area. It supports skin integrity without the repeated soap-and-water exposure of a full bath. Frequent full bathing can disrupt the skin barrier — a real concern for older adults whose skin is already prone to dryness and breakdown.
When a Partial Bath Is Appropriate
Use a partial bath when:
- The resident's care plan specifies partial bathing
- The resident is between scheduled full baths and needs daily hygiene maintenance
- The resident is too fatigued, uncomfortable, or medically unstable for a full bath
- The resident has the ability to assist with some areas and only needs help with others
Knowing when a partial bath fits the situation is the first step — but residents also have a say in whether and how it happens.
Resident Rights and Refusals
Residents have the legal right under 42 CFR 483.10 to choose their bath type, timing, and method, and to refuse bathing entirely. When a resident declines:
- Offer an alternative method or time of day
- Document the refusal per facility policy
- Notify the nurse if hygiene is being compromised
Residents with dementia often resist bathing. In those cases, these approaches tend to work better than pressing forward:
- Offer simple choices ("Would you like to start with your face or your hands?")
- Use a calm, unhurried tone throughout
- Schedule the bath at a time of day when the resident is typically more at ease
What You Need Before Performing a Partial Bath
Gathering all supplies before approaching the resident prevents mid-procedure interruptions that compromise comfort, privacy, and safety.
Required Supplies
- Wash basin with warm water
- Soap and lotion
- At least two washcloths and one towel
- Clean gown or clothing
- Gloves
- Waterproof pad or paper towel (barrier for basin)
- Linen bag or hamper
Environment and Equipment Readiness
Before beginning:
- Raise the bed to a safe working height
- Position side rails appropriately
- Close the privacy curtain fully
- Place all supplies within reach
Leaving to retrieve a forgotten item mid-procedure disrupts the resident's comfort and privacy — have everything in place before you begin.
Safety and Compliance Checks
Complete these steps before any physical contact:
- Perform hand hygiene
- Introduce yourself and verify the resident's identity
- Explain the procedure clearly
- Review the care plan to confirm which areas should be washed
Care plans sometimes restrict specific areas — for example, avoiding one arm due to an IV site, or skipping a wound area covered by a dressing. Follow those instructions exactly — it's a scope-of-practice boundary, not a judgment call.
Step-by-Step: How CNAs Perform a Partial Bath
The procedure has three phases: pre-procedure setup, the bath itself, and post-procedure wrap-up. Each phase has specific steps that directly affect resident safety and hygiene outcomes.
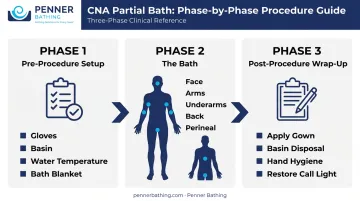
Pre-Procedure Setup
- Don gloves before handling any supplies
- Fill the wash basin with comfortably warm water — per Texas HHS guidelines, approximately 105°F, checked on the wrist or forearm
- Have the resident confirm temperature is comfortable by placing their hand in the water or applying a wet washcloth to the back of their hand
- Place the basin on a flat surface covered with a waterproof pad or paper towel
- Keep the resident covered with a bath blanket at all times — only expose the area being washed
The Bath Procedure
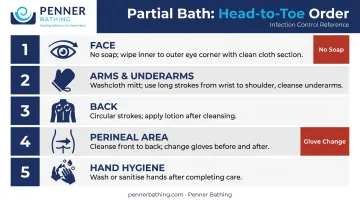
Face (no soap): Use a clean, damp washcloth without soap. Wipe each eye from the inner corner to the outer corner, using a different corner of the cloth for each eye. This direction prevents debris from entering the lacrimal duct. Wash the rest of the face without soap unless the resident prefers it. Pat dry gently.
Arms and underarms: Remove the gown from one arm only, keeping the body covered. Place a towel under the arm, form the washcloth into a mitt, apply soap, and wash using long strokes from top to underarm. Rinse with a second clean washcloth, then pat completely dry — moisture trapped in skin folds promotes breakdown. Wash underarms with soap, rinse, and dry thoroughly. Move to the other arm using clean water or a fresh cloth.
Back: Assist the resident in rolling to one side. Wash, rinse, and dry the back using circular strokes. If the care plan includes a back rub, apply warmed lotion in circular motions from the lower back upward and wipe off any excess. This is a comfort measure, not a therapeutic massage.
Perineal area (last): Use a fresh washcloth and follow facility protocol: wash, rinse, and dry from front to back. Change gloves before perineal care and again immediately after.
Perform hand hygiene after glove removal. The CDC confirms that gloves do not replace hand hygiene — clean hands are required before donning and after removing them.
Post-Procedure Steps
- Assist the resident into a clean gown or clothing
- Empty, rinse, and dry the basin; return equipment to proper storage
- Place soiled linens directly in the hamper — never on the floor or bed rail
- Remove gloves by turning them inside out; dispose of them properly
- Lower the bed to its lowest position and lock the brakes
- Place the call light within the resident's reach
- Open the privacy curtain
- Perform hand hygiene
- Document and report any skin observations from the bath
Key Considerations During a Partial Bath
Head-to-Toe Sequence
Always work from head to toe without backtracking. This directional sequence prevents pathogen transfer from the perineal area to cleaner body regions. Change washcloth sections between areas — or use a fresh cloth entirely — rather than re-dipping a used cloth into the basin.
Water Temperature Management
Water cools quickly. If the water feels lukewarm during the procedure, replace it before continuing. Washing with cold water causes discomfort and can trigger involuntary muscle tension in residents. Never assume the water is still comfortable; check or ask again mid-procedure if needed.
This matters especially for residents with diabetes or neuropathy, whose temperature perception in the extremities may be impaired. Checking with your wrist or forearm is more reliable than testing with an affected hand or foot.
Dignity and Privacy
Only the area being cleaned should be uncovered at any time. Use the bath blanket to cover everything else. This is both an ethical obligation and a regulatory requirement under CMS F550 and F561, which require dignified treatment and respect for resident preferences during personal care.
Never leave a resident fully exposed, and never leave the room during a bath.
Skin Assessment
Every bath is also a skin assessment opportunity. Observe and report:
- Redness, open or broken skin, bruising, or rashes
- Dry or flaky skin in pressure-prone areas
- Foul odor that persists after washing
- Discharge from any area
- Behavioral signs of pain — pulling away, agitation, or crying out
Pay particular attention to skin folds: under the breasts, in the groin, armpits, and between toes. These moisture-prone areas are where skin breakdown begins most often.
Common Mistakes to Avoid
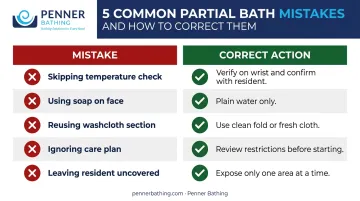
Skipping the water temperature check. Water that is too hot can burn a resident with reduced sensation from diabetes or neuropathy. Always verify temperature before contact — and let the resident confirm comfort, not just your wrist.
Using soap on the face. Soap irritates delicate facial skin and mucous membranes. Plain water is correct for facial cleaning during a partial bath.
Reusing the same washcloth section across body areas. A soiled section spreads bacteria to the next area you wash. Use a clean fold or a fresh cloth between each area, and never re-dip a used cloth into the basin.
Ignoring the care plan. Wounds, IVs, and active dressings may restrict which areas you're authorized to wash. Cleaning a restricted area without authorization is a scope-of-practice violation — follow the plan even when the reason isn't spelled out.
Leaving the resident uncovered or alone mid-procedure. Expose only one body area at a time. If you need to step away, cover the resident, lower the bed, and call for assistance — an unattended resident mid-bath is both a fall risk and a dignity concern.
Partial Bath vs. Other Bath Types: When to Use Each
| Bath Type | When to Use |
|---|---|
| Partial bath | Daily hygiene maintenance; between full baths; per care plan |
| Full bed bath | Residents unable to leave bed due to pain, immobility, or cognitive limitations |
| Shower | Residents who can safely sit in a shower chair or stand with supervision |
| Tub bath | Independent residents or those with a provider order for a therapeutic bath |
For facilities supporting full-immersion therapeutic bathing beyond bed-based care, purpose-built healthcare bathing systems reduce the burden on CNAs while strengthening infection control. Penner Bathing, a Nebraska-based manufacturer serving nursing homes, hospitals, and assisted living facilities since 1980, produces models like the Pacific and Cascade — designed specifically for long-term care environments.
Key features that support high-volume bathing shifts include:
- Fast-fill reservoirs that reduce water preparation time between residents
- Automatic disinfection cycles that eliminate manual cleaning steps between uses
- Built-in BioCote® antimicrobial surface protection for continuous infection control
- UL and CUL listing meeting safety compliance requirements for regulated healthcare settings
When a resident consistently refuses any bath type, document the refusal, attempt care at a different time, offer alternative methods, and involve the nurse if hygiene is being compromised.
Conclusion
A partial bath is a daily CNA skill that does more than maintain cleanliness. Done correctly, it protects skin integrity, supports resident dignity, and provides a structured opportunity to observe and report changes that a nurse needs to know about.
Consistent technique is what keeps residents safe and care defensible. Every step matters:
- Follow the care plan before starting
- Maintain the head-to-toe sequence throughout
- Change washcloth sections between body areas
- Monitor and manage water temperature carefully
- Keep the resident covered except for the area being washed
These habits reduce infection risk, prevent skin breakdown, and ensure nothing gets missed — shift after shift.
Frequently Asked Questions
What is a partial bath?
A partial bath covers the face, underarms, arms, hands, and perineal area — the zones most prone to odor and infection. It maintains daily hygiene without the skin-drying effects of a full bath.
What is the difference between a bed bath and a partial bath?
A full bed bath involves washing the entire body while the resident remains in bed. A partial bath covers only the highest-priority areas — face, underarms, arms, hands, and perineal area — and can be performed in bed or at the bedside.
What are the 4 types of baths?
The four types are partial bath, full bed bath, shower, and tub bath. The appropriate choice depends on the resident's mobility, medical condition, and care plan specifications.
How often should a CNA give a partial bath?
Partial baths are typically given daily, or as specified in the care plan. They fill in between scheduled full baths to keep high-priority areas clean and comfortable.
Can a resident refuse a partial bath?
Yes. Residents have the legal right to refuse any bathing. CNAs should offer alternatives, try a different time, or notify the nurse if hygiene is being compromised, and document the refusal per facility policy.